One of the advantages of new construction over purchasing an already completed house is the ability to see the things behind the walls and get an idea of how the wiring and plumbing snakes through the walls. This helps for future expansion or just upgrading the existing.
As part of the pre-drywall walk through we were able to see the layout of wiring and plumbing and asked a few questions about it.
Electrical - Wiring
Immediately upon entering the house through the garage one of the first things you can see on the outer wall of the house is the electric box, still opened up but all the wiring is fed into the box. The house has 200 Amp service, but on this day it was not yet hooked up.
|


The service will ultimately be expandable as there a number of open slots based on the wires in versus the spots in the box. The one odd ball orange wire runs to the unfinished basement where the utilities are and will be for sump pump. It appears they used yellow wiring to the outlets and white wires to the switches and lights. I didn't check if the gauge or coating is different between the wires, I will check next time I talk to Bob.
 |
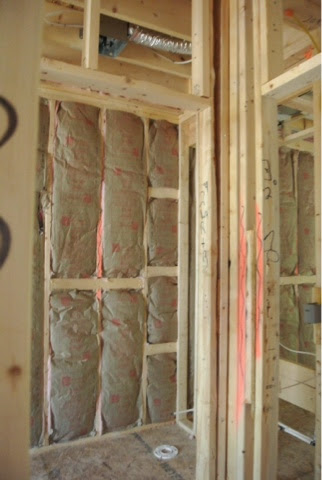
| Wiring in ceiling above the garage |
The wiring runs over head up into the attic spaces, then down the wall to the receptacles, which should make it easier to expand later if necessary by running it up the same path they took when it was originally run.
 |
| View through Crawl Space in Master Closet |
In another look you can see the same run of the wires over the garage, this time through the crawl space opening in the master closet. While this is not wiring related you can see the PVC pipe which runs up through the left side of the picture, this is a Radon pipe, it helps ventilate any radon out from the bottom of the house through the roof. There is no fan attached by default but could be added should remediation be needed at a later date. The pipe is marked in big letters Radon, this is so contractors or home owners don't cut into it thinking its a drain pipe.
Electrical - Lighting & Receptacles
Additionally on the electrical side there is a a number of other items you look at during the pre-drywall meeting, one of which is the lighting. The base model has limited lighting by default and much of the items are options. In our case we chose three rough ins, which are essentially just the connection for the addition of ceiling lighting or a ceiling fan, and the recess lighting package for the kitchen.
 |
| Rough In - Morning Room |
Our rough ins are located in the master bedroom, family room and morning room. Our intention is to put ceiling fans with lights in both the master bedroom and family room and a chandelier in the morning room. Above you can see the morning room rough in. The important thing to remember if you choose this is to make it abundantly clear that it needs to be centered on a flat surface of the peak. We read on another blog that there's was originally installed on the angled beam and had to complain to get it moved. In our instance this didn't happen it went in perfectly, they added a cross beam and installed it as requested.
The rough in allows you to have the electric and the support necessary for heavier items without having to roll in the cost of the device to the mortgage, for what will most likely be a basic fan or light. Since these are options you should be allowed to select there location, if your not happy with where they are placed be sure to speak up!
 |
| Recessed Lighting - Kitchen |
We felt the kitchen recess lighting package was a must as the default lighting is a long florescent light which looks like it belongs in a commercial building not a residential home. Make sure to ask to see the base lighting for the kitchen at least a picture of it before moving forward without the recessed lighting package, as it will most likely not be in the model home.
In our home there is five lighting fixtures included with the package, and is the only place in the house where there is a chance to get it as a package deal and not purchasing a single one at a time
Electrical receptacles are standard in the house and based on local building codes have different requirements but as we learned the specific location is not always exactly the same. In our house the codes require a receptacle withing 60 inches of the corner of the room and no more than 12 feet from the next closest one. In other words a ample number of electrical outlets throughout the house. No if there is a specific place you want an outlet, you can try to work with the PM, but more than likely you will need to buy an additional one. Any one you buy extra should be placed precisely where you want it, and not in the run of standard outlets.
 |
| Kitchen Receptacles |
Above you can see the receptacles that will be above the kitchen counter for outlets and switches. Just in that one corner that is a lot of electric! For our house we purchased two additional outlets one that will go with the wall mount setup for our TV in the master bedroom and one on the exterior centered between the two windows, where the deck will ultimately go. The wall mount extra outlet is a must or you defeat the purpose of adding a wall mount setup as your power cord will be hanging down from the TV.
The outside outlet was placed in the wrong place, just under the corner of the window, I think the electrician was following the 60 inches from the corner rule, but this should not have applied and it should have been placed in the proper location. We let our PM and Sales Representative know and I will follow up when we hear back on whether they can move it or it will have to stay as is.
 |
| Electrical Receptacle |
Above is a picture of the insulation pulled back to see the wire run to the receptacle. The wire runs up along the stud in this case.
 |
| Cable / Data Receptacle |
A second type of receptacle is for cable and data connection. This may vary in your area but as part of the base house price you get two phone and two cable connections, placed anywhere you want in the house. The representative from the wiring company worked with us, since we don't have a home phone and if we get one it would be a Voice over IP (VOIP) phone which would not require standard phone lines, so we were able to get 3 cable and 1 data as part of the standard package. We decided to add 2 additional cable connections and 1 additional data connection.
Plumbing
The other items which can be seen before the walls are closed up is the plumbing, and vent ducts. In new construction the piping for water intake is PEX a highly flexible and durable product. It is able to be easily curved and fit into application behind the walls with fewer joints that copper pipe. Copper pipe also is a target for theft due to the value it obtains as scrap. If cooper was used in the house prior to the walls being closed up it is likely it would be stolen out of the house. For drain pipes PVC is used it is more rigid and comes in a larger size which makes it good for this purpose.
 |
| PEX, PVC & Ducts |
In the above picture, as seen from the family room looking up, you see application of both PEX and PVC with some aluminum duct work The PEX can be seen on the right side of the picture, thin and flexible the pipes that curl up are the hot and cold water which are going to the master bathroom. Multiple PVC lines are both ventilation for the drains in the powder room on the main floor and drain lines for the master bathroom.
The following are a couple views from the upstairs hallway bathroom, on the left you will see the hot and cold water PEX lines in thin, both running for the sink which will sit directly in front of where this picture is taken, the toilet and tub which sit to the right of the view from this picture. Additionally you will see the drain pipe for the sink.
|
|


The pipe that appears to go up is in fact the drain pipe, but as mentioned earlier the way they design it is to have the drain pipe with ventilation to allow air to help push down the water as it moves through the pipe and make it easier to move the waste water away and out to the sewer line. This can also be seen in the next picture from the master bathroom.
 |
| Master Bathroom Plumbing |
In the laundry room they prepare the waterlines for a washer hookup. This is different than the lines to sinks as these need to be placed in a manner to cap the line and allow for hookup after the fact. The washer lines feature both the hot and cold water as well.
 |
| Washer Hookup |
Behind the wall in the kitchen between where the refrigerator and the laundry room sit is the main return vent as well as the and the radon vent pipe. Its tough to notice in the picture but the radon pipe is marked here so that it is not cut into so that the ventilation for radon is maintained.
 |
| Main Ventilation And Radon Pipe |
In the final look behind the walls is something I had never seen before my experience with building this house. It is a ventilation channel for the fan that goes over stove in order to ventilate out the house rather than your standard fan that just circulates it up and away but the hot air remains in the room.
 |
| Oven and Microwave Vent |
In the next look we will see the house interior with walls up. The house keeps moving along quickly, we received the tentative closing date, of June 20th. Our Sales Representative Jackie says once we are at the stage we are and the work is all inside that the closing date is most likely not going to move, but no guarantees.
No comments:
Post a Comment