Showing posts with label second floor. Show all posts

Tuesday, May 27, 2014

Drywall Installation - Second Floor

As you are probably aware by now the second floor is accessed from the family room heading back towards the front of the house.  It leads to the loft and hallway which then connects on to the bedrooms in the house. We will look at these rooms now that the walls are up and get a feel for the second floor.

The Loft


The loft which will serve as an office area for us, is an open space at the top of the stairs.  It is a good size with plenty of room for a nice desk.  Other options one might do in this area would be an exercise room or sitting area, kind of an upstairs family room.  In the first look you will see the loft looking back from the top of the stairs.  I am not too excited about the electric layout, and some other areas as the electricians didn't put outlets next to the data and cable connections.  If you are building with Ryan and you have the chance I would ask if you can be there on the day of the wiring so that you can request this.  Its not the end of the world but it would make practical sense that if someone is adding a cable or data connection that they would need power at the same spot.  In the picture here the data connection is the one on the wall pictured in the left and the closest outlet is the one in the corner of the same wall.

Picture of a Ryan Homes Florence Model loft with drywall installed
Loft - View from Top of the Stairs
When looking back from the corner of the loft you can see the top of the stairs and get a real understanding of how much space it is and how big the are looks due to the openness.  The two windows bring light to the front of the house.  You will see a round opening in the ceiling just at the top of the stairs which will be for the light at the top of the stairs, safety feature so its included in the base.  Switching it to a recessed light would be an upgrade.


Picture of Ryan Homes Florence Model loft with drywall installed
Top Landing of Stairs - View from Loft

Bedroom 2 & 3


Immediately down the hall from the landing at the top of the stairs is bedroom 2 and then bedroom 3 separated by a linen closet.  These rooms are the hardest to get a good picture of, both are square of the same dimensions, good size for children's rooms.  In the model home both have a full bed in them and there is still room left over.  Either room with a twin in the corner would have room for a kid to have toys as well.

Bedroom 2
Picture of Ryan Homes Florence Model bedroom 2 view from the hallway with drywall installed
Bedroom 2 - View from Hallway
Picture of bedroom 2 view from inside the room with drywall installed
Bedroom 2 - View from Inside the room
Bedroom 3

Picture of bedroom 3 as viewed from the hallway with drywall installed
Bedroom 3 - View from the Hall
Picture of bedroom 3 view from inside the room with drywall installed
Bedroom 3 - View from Inside Room

Master Bedroom


The master bedroom including the bathroom covers the entire back of the house, a long rectangle with a walk in closet in one corner, and bathroom at the other.  In the center of the room we added a rough in to allow us to add a ceiling fan and light to the room.  The room is quite big I would highly recommend a rough in for light or fan with light or recessed lighting for the room.  A combination of the two could be a possibility as well.  The room definitely needs some overhead light though.

Picture of the master bedroom as viewed from the master bathroom with drywall installed
Master Bedroom - View from Master Bath
The above is a look at the room from the doorway of the master bathroom, in which you can see the optional window added to the end of the room.  On the right side of the picture you will see the entrance to the walk in closet.  The walk in closet is a great size in the floor plan with the loft, but seems to be a little small with the four bedroom layout as the back portion of it is used for the fourth bedroom closet. 

Picture of the master bedroom walk in closet with drywall installed
Master Bedroom Walk In Closet
The room has a small corner wall, which is the corner of the third bedroom  and behind that is the entrance to the master bathroom.

Picture of the master bedroom as viewed from the walk in closet with drywall installed
Master Bedroom - View from Walk in Closet Corner

The wall mount TV setup does not include the mounting bracket, which will be made clear by the wiring representative.  You will also need to sign off that you understand the same.  Additionally the extra electircal outlet needed to be ordered through the Sales Representative, so that there is power at the wall mount location. They setup the connections directly on studs as you can see from the lines of spackle on the wall in the following picture.

Picture of wall mount TV Hookup just after drywall installed
Master Bedroom - Wall Mount TV Hookup

Bathrooms


There are two full bathrooms on the second floor of the Ryan Homes Florence model, one in the hallway and one in the master bedroom.  The master bathroom has a number of different optional setups, the one shown as the default is a garden tub with a small standing shower.  In this arrangement there is no linen closet in the bathroom just one in the hall.  In the model we choose there is a large double shower, and linen closet.

Picture of the master bathroom as viewed through the doorway just after drywall installed
Master Bathroom - View from Bedroom
Picture of the master bathroom shower just after drywall installed
Master Bathroom - Shower
You may have noticed a very different looking drywall in the shower where the tile will reside.  This is because it is cement board, and not the typical drywall.  Cement board is better for holding up tile and providing a more water durable product than typical drywall or the old standard in bathrooms green board.
The hallway bathroom features a tub, toilet and vanity, and is situated just outside the master bedroom. Once again you can see the cement board application below.

Picture of the hallway full bathroom as viewed through the doorway just after drywall installed
Hallway Bathroom
Picture of the hallway full bathroom shower just after drywall installed
Hallway Bathroom - Shower
Just above the shower you will see a light, which in talking with Bob was an addition to the base floor plan due to customer feedback surveys, as it was noted multiple times that there was not enough light in that shower.  This is one of the advantages of getting a model that has been available for sometime as you get improvements which have occurred due to consumer feedback.

Hallway and Stairs


The last part of the second floor closed up with drywall we will take a look at is the upstairs hallway and the stairway.  In both of the subsequent pictures you will see a temporary railing around the opening of the stairs. This is in place because we choose the railing with spindles for the entire upper portion of the stairs as well as the small portion on the bottom.  It all comes as a set.  If you stick with the default the area you see with temporary railing would all be a wall with drywall closed in and capped off.  The default setup is the hardest thing to see in a model or even on other Ryan Homes blogs.  We did find two examples of it and based on that one image we decided against it, as it didn't look right for us.  The following is our house in under construction and two examples of what a capped wall would like.

Picture of the upstairs hallway just after drywall installed
Second Floor Hallway
Capped Wall - Top of Stairs
(http://buildingourabode.blogspot.com/)

Capped Wall - Bottom of Stairs
(http://florencewithryanhomes.blogspot.com)
Back into our our house you can see where the railings will be going around the stair case.  In the picture you can see the the light travels through and whole hallway from the front windows, which is the nice part of the open railings as opposed to the capped wall.

Picture of the stairway between first and second floors just after drywall installed
Stairway

Attic


From the master bedroom walk in closet there is two access panels, one to the attic over the garage, and one to the attic over the remainder of the house.  The architecture of these are not designed for storage, but rather just for access for wiring or other service activities.  In order to have storage in the attic you need to upgrade and have a different architecture used to support storage.  If you get the morning room addition this is most likely not necessary as the space in the basement even with the finished basement option is quite sizable, and probably easier to get to, not pull down stairs.

In the attic areas they use a different method of insulating, instead of standard roll insulation they blow in the insulation.


Picture of the attic of the garage with insulation
Attic - Blown Insulation Measure

Attached to one of the vertical beams is a sticker with measurements on it, to allow them the ability to measure how much insulation has been blown.  

Picture of the attic of the garage with insulation
Attic with Blown Insulation

One final look at the Drywall installation will be coming which will look at the basement and some of the items contained within.

Sunday, May 18, 2014

Pre-Drywall Meeting - Part 2

This is part two of the series for the pre-drywall meeting.  If you missed the first post the pre-drywall meeting is the home buyers chance to see the things behind the walls before it is closed up and have a walk through of the interior of the house where the you can ask questions to the project manager about the different elements of those behind the wall items.  In the walk through my wife and I took, I took a number of pictures so I am breaking down the posts into a couple different sections.  This post will take a look at the inside of the house focusing on the rooms themselves in the next post we will take a closer look and the items in the walls, like electrical and plumbing.

Pre-Drywall - First Floor

The front steps are not in at this point so entry into the house is always through the garage, I imagine it will be similar once everything is all said and done.  Through the garage is entry passing through the laundry room and into the kitchen.  From the entry into the house the first view I saw was out the back through the morning room.  The lighting at the time we came over 9:30 AM was great in here, the open floor plan lets light flow throughout the house. No lights or flash required here!

Morning Room
As we moved in to the house I was able to get a different angle on the morning room, at the point where it intersects the kitchen.  You can see the half wall which separates the two rooms and serves as the hinge point for where the gourmet island optional feature we picked will jut out into the kitchen on an angle towards where I am standing in the following picture. 
Morning Room - Kitchen Intersection
A few steps forward and allows us a look into the kitchen.  

Kitchen
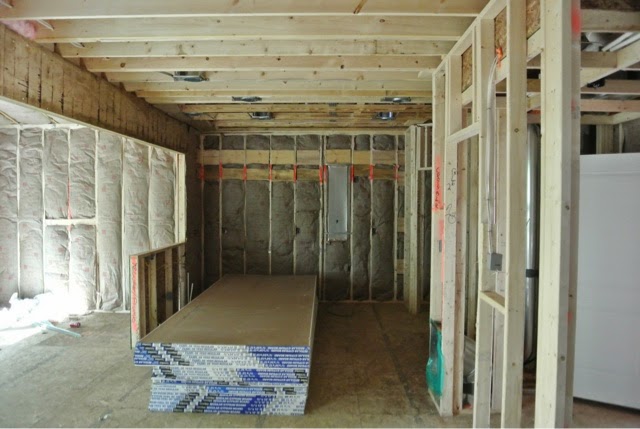
In the picture above you are able to see the whole of the kitchen on the left side in front of the half wall you can see the drain pipe and water lines which is where the sink will be.  in the center of the picture a grey metallic area is in front of where the stove will be located. The angled wall in the far right of the room is the pantry.  This is a standard part of the Florence model floor plan but was a great feature in the house for us.  Storage in and around the kitchen was always a challenge in our current house, this space will provide that easy access area, especially for some of the bulkier items, like the 12 pack of paper towels.  The near right is the laundry room from which we first entered.

Here are a few additional angles of the kitchen:
Kitchen from the Family Room

Kitchen from the Morning Room
Adjacent to the kitchen is the family room, which is the third room including the morning room and kitchen which make the large open floor plan on the main floor of the house.  This will be the main gathering area, and is the gateway to the second floor.  In the Florence model the staircase to the upper floor starts from the back of the house and goes up towards to the front.  In the next picture you will get a glimpse of the family room from the third step from the bottom of the stair case.

Family Room
For the room that we will spend a great deal of time in, I take very few pictures of it.  Just the one from the many pictures was of it, I will have to take it from a few different angles next pass through.  Off to the left of the picture above will be the first floor powder room and coat closet.  These are tough places to get good pictures as they are small areas, but without walls you can see them through from the other rooms.

Powder Room and Coat Closet

The picture above is of the powder room on the left and coat closet on the right as seen through the wall from the living room.  This is the front room, kind of a sitting room, but from the looks of it in the following couple pictures it seems much bigger than a sitting room.

Living Room - As Viewed From Front Door
Living Room - Side View
There is an option to have a window in the side wall of the house which is the one directly ahead in the above picture.  We obviously decided not go with some due to cost, but I don't think its necessary as there is plenty of light from the double front window.  There is a lot of extra wall space available as well.

Front Door - Inside View

Above is a look from the corner of the living room back towards where the previous two pictures were taken, looking at the front door straight ahead.  You can see off to the left of the picture the staircase down into the basement.  It will lead to the finished portion.  I didn't successfully get any pictures down there a little too dark and my flash didn't go off.  However down there we were able to see the sub-pump, furnace and hot water heater in the unfinished section.  In the next post I will take you through some of the items we talked about down there in regards to the wiring and piping that exists in that section. On to the upstairs!

Pre-Drywall - Second Floor

At the top of the stairs up from the family room is the loft, if your out looking and have a Florence Model as the model home in the development you will most likely not see this option as this can be a fourth bedroom. The loft is the standard option, I think its one of the best features, if you don't have an overwhelming need or plan to need a forth bedroom, stick with this floor plan and throw the budget at some other option.  The loft makes the top of the stairs wide open, and it looks giant.  The loft also makes the master closet larger as some of the space is used for the 4th bedroom closet.  There is an optional window in this room, totally unnecessary in this selection the two front windows one directly in front of the stairs and one in the loft provide ample lighting.

Loft
Loft with temporary railing
The loft is in the front right of the house, at least on the standard build and not reversed floor plan.  on the left side of the front of the house is the second bedroom.  From the top of the stairs which faces towards the front of the house you make a right and loop back towards the back of the house. The hallway has two doors on the left one for each of the second and third bedrooms.

Second Bedroom
In the above picture since you can see through the walls all of the three front windows on the house can be seen on the right is the second bedroom.  On the left you see the top of the temporary banister for the stairs and the loft off in the distance.  And in the one below you can see the room itself.

Second Bedroom
In the second bedroom there is an optional window on the wall in the right of the picture.  If it is in your budget this one could be a good one to get to have some extra light, but not entirely necessary.  It does take a little of the wall space away, so in our case we went without the selection, should give a little more room to work with.  A little further down the hall is the third bedroom, which has one window and no optional one available as it only has the one wall to the outside of the house. This room divides the house right through the middle, with the other bedroom to the front and the master bath to the back.  In the below picture you can see the master bathroom and some of the plumbing for it through the wall. 

Third Bedroom
The view above is from the doorway while the one below is looking back the other way to the front of the house.  You can see the closets for both the second and third bedrooms as well as the hall closet. 
Third Bedroom
Finally we have the master bedroom which takes the whole of the back of the house when you include the master bathroom. The first picture looks from the inside corner of the room on the garage side of the house looking across the master bedroom towards the bathroom.   
Master Bedroom
The final look below takes the other angle of the master bedroom, in which you can see the optional window to the left.  This is a must have in our opinion gives the large room so much extra light and helps as the sun moves throughout the day to get a different lighting perspective.  In the front right of the picture is the entrance to the walk in closet.
Master Bedroom
The next post, the third in the pre-drywall meeting thread, will take a more detailed look at some of the items behind the wall.

Thursday, May 1, 2014

Journey to the Inside of "Florence" Part 2

Yesterday we explored the inside of the first floor, but left out the trip down stairs and upstairs for sake of not running one post on too long.  So here is the first look at the inside of the basement and first floors.  

As one might expect the basement was quite dark, there is very limited windows in the design, just a small one, maybe one foot by three foot in size, that is situated at the back of the foundation wall just below the morning room.  I wish there was a few windows along the left side of the house to bring some natural light into the finished basement side, but that was not to be.  We never asked about adding some since we were already budget maxed with the other upgrades, but if your building a Florence it might not be a bad thing to ask about.

The frame for the finished basement walls are already up, and the drain plumbing was in but little else.  The hot water heater had been delivered and sat in a dark corner of the basement.  I tried to get my camera to take some pictures but couldn't pull enough light for it to work.  Bob was able to help out by using a flashlight app on his cell phone in order for me to catch just a couple.  The first is the area is where the hot water heater, furnace and sump pump will ultimate reside.  Sorry for the blurriness not my finest work!

Unfinished Portion of the Basement
The second picture is taken from the base of the stairs looking into the finished portion of the basement facing the front of the house.  You can see the wall for where the storage closet in the front of the basement will reside.  additionally you can see the reddish color in the upper right portion of the picture this is a steel beam support running across the house surrounded by wood so that the walls can be finished.

Finished Side, or soon to be finished
After checking out the basement we headed back up to the first floor and around to the back of the house into the family room.  From there we went up the stair case to the second floor.  At the top of the stairs off the the left, front right of the house when looking from outside, just above the garage is the loft area.  The model home has the fourth bedroom option so this area is all walled off in it, so we never saw exactly what it looks like, still can't fully see it but it looks giant in the pre-drywall state.

Loft

The area in back left of the picture will be the walk-in closet for the master bedroom.  I spun to the left taking another picture from the same location, but you can see through to the back of the house, it gives you a good look at the full size of the house before the walls are up.  Additionally you can see the tub has already been placed for the hallway bathroom and a good look at just how big the walk-in closet will be.  It is bigger in the layout with the loft over the four bedroom version, as they take away a portion of it for the closet in the fourth bedroom.  I think especially for us the loft was by and far the way to go!

Loft looking through walls at bathroom and master closet
We moved around the stairs and down the hall towards the master bedroom situated at the back of the house  and looking to the right we get another angle on the hallway bathroom.  Looking in from the door, rather than through walls.  You can see the tub and location of the drain for the toilet.

Hallway Bathroom

After looking in on the bathroom, I took the first look at the master bedroom.  Taking a look to the right from the doorway we can see the main area of the bedroom and the corner window. The corner window is one of the optional windows we chose, and I am happy we did it will bring much more light into the room.  Off to the right is the entrance to the walk-in closet we saw through the wall from the loft picture.

Master Bedroom

A look into that closet, wow that is big, much larger than the closet in our current house, they didn't use up much space for closets in older homes, but they sure do now.  Looks to be a return vent in the upper right of the picture.

Walk-In Closet in Master Bedroom

Next we took a look at the master bathroom, we chose the large shower stall and linen closet option.  The garden tube seemed unrealistic for us, as we imagined how little we would use it.  In speaking with Bob he mentioned that from what he has been seeing in Florence models this setup has become more of the normal scenario but with Milan models the garden tub still holds the lead.  It will be nice to have the linen closet in the bathroom itself, in our current home its in the hall, and it can be annoying.  This would be especially more annoying in this scenario as the other linen closet is in the hall between the first and second bedroom which would require you t go out down the hall to grab a towel.  You can see in the following picture the shower basin and closet.

Master Bathroom
The window for the bathroom will be on the wall just off to the left of this picture, and i am standing where the sink will be.  The final look is down the stairs from the landing outside the loft looking into the family room.  I missed taking pictures of the second and third bedrooms, I will get them next time.

Stairway

Wow what a long post, guess it should have been a three parts!